
By Richard Lake
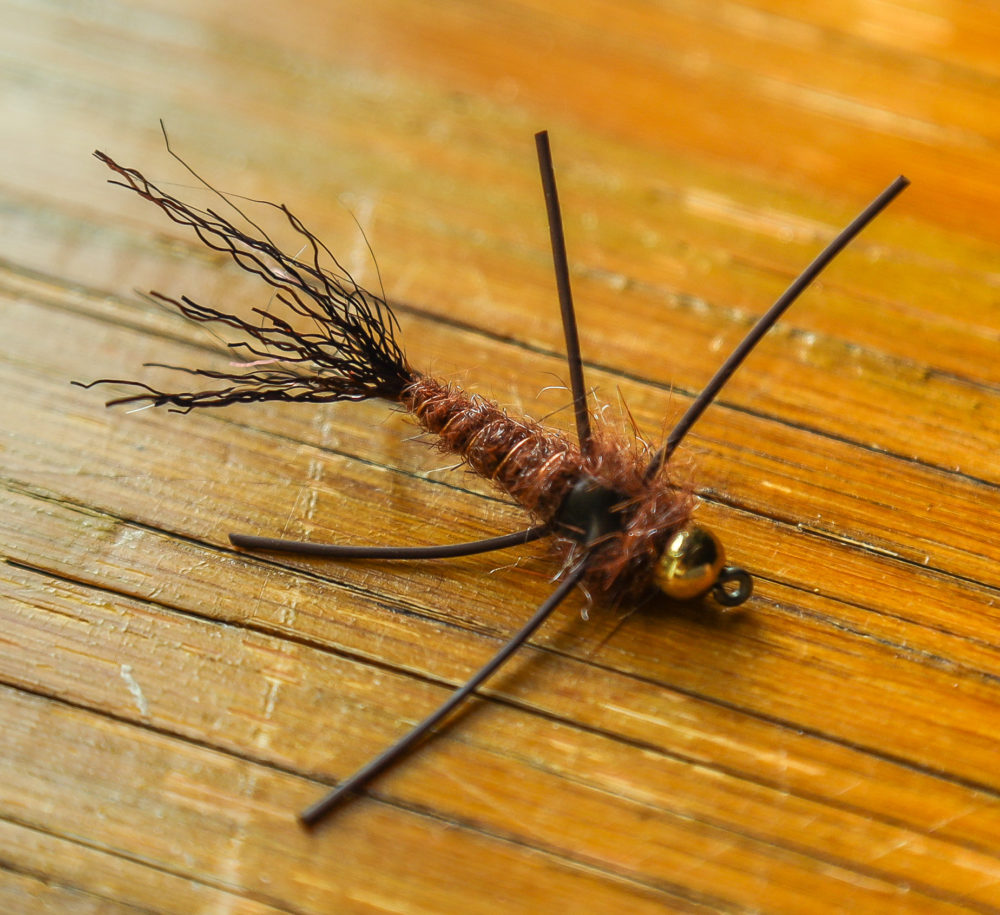
Crayfish are a huge part of many species diets, this is a simple pretty generic pattern I started tying to target carp in the community ponds and the lakes here in Utah. This has been a productive pattern during the summer months through the fall for me and a go-to if nothing else is working. I’ve tied them up in a variety of colors for different lighting situations, water clarity and some to entice a take. Although I’ve fished them mainly for carp I’m sure they’d work for any species where crays are a food source.
Basic Crayfish Recipe:
- Hook: Size 8 3X-Long Nymph/Streamer hook (TMC 5263 or equivalent)
- Thread: Fluorescent Pink 210 Denier or 3/0
- Bead: Medium Bead Chain Eyes
- Tail (claws): Natural Grey Squirrel Tail
- Body: Crusty Nail Senyo’s Fusion Dub mixed with Red Ice Dub
- Rib: Copper Medium Wire
- Back: Scud Back 1/8” Clear
Step 1: Start a thread wrap around the shank of the hook and laydown an even baselayer of thread. After building up a nice thick base wrap back towards the eye of the hook and stop about 4 wraps away from the eye.

Step 2: Attach the bead chain eyes by making X wraps. I’ll also make a few wraps underneath the eyes creating a base to help keep the eyes from twisting around the shank of the hook. Once you’ve tied in the eyes make wraps down the shank and stop at the barb.

Step 3: Take your squirrel tail and cut off a nice clump of hair, hold the clump at the top tips of the hair and pluck out the underfur from the clump leaving the longer guard hairs. Wrap in the squirrel hair to the shank of the hook favoring the far side of the fly. Once it is secure make a few wraps underneath the hair to keep this clump together then make wraps up to the eye of the hook and back down to your last thread wrap. Next repeat this process and attach the second clump of squirrel hair to the opposite side of the first creating what looks like two claws coming off the back of the hook.


Step 4: Next cut off about 2 inches of copper wire and tie that in at the back of the hook where your last thread wrap is, next wrap in the scud back to the underbelly of the fly at the same spot as the wire.

Step 5: Next take your Crusty Nail and Red Ice Dub, use about a 1:3 ratio when blending the dubbing, 1 part red ice dub 3 parts Crusty Nail. Using your fingers blend the two dubbings together giving the Crusty Nail a red tint.


Step 6 : Once blended start apply dubbing noodles to your thread and dub up to the eyes, once at the eyes you’ll want to make X wraps around the eyes with the dubbing covering the exposed thread around the eye, leave your thread between the bead eyes and the hook eye for the next step.


Step 7: Pull the scud back forward and tie it off right behind the eye of the hook. Next make wraps with the copper wire up to the eye of the hook creating segments in the fly and tie it off and finish the head with a whip finish.

Step 8: Finally with a dubbing brush or your bodkin, brush or pick the dubbing fibers out on the top of the fly giving the fly a bushy look or what will look like a crawfish tail curled up as if it was swimming.

Stay tuned for more fly patterns from the Fishwest staff, if you have any questions or patterns you’d like to request feel free to contact us at support@fishwest.com


