
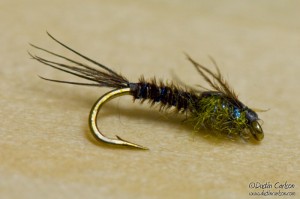
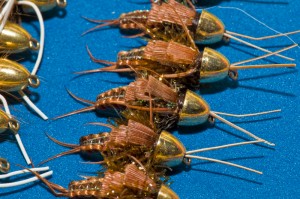
Guide’s choice. A lot of anglers might hear that terms and say, “what does that even mean?” Well, it might surprise you but guides actually tie their own flies and give them to clients to use while out guiding. This means that they will want to use flies that are quick and easy make because clients suck at fishing and lose most of the flies given to them. Hence, the term guides choice because they work and are easy to create. Often you will see guides choice hare’s ears but I like to use a little different variation of a pheasant tail that follows along the same progression as the guides choice hare’s ear. However, this little dandy has an added feature of a split biot back down that back of the hook body. Furthermore, I find a nice orange tungsten bead adds a little flash that the fish can’t resist.
I’m not really sure who started this whole biot along the curvature of the hook, but I can tell you it sure looks pretty. The fish seem to agree with me as this variation of fly has lead to fish after fish, especially after casting a few of “go to’s” without much success. So, let’s get down to the nitty gritty and discuss how to tie up this beautiful buggy fly.
What you will need to start:
Step 1:
Crimp down any barb you have on your hook using your vise and then slide on the orange bead onto the hook. Take your brown thread and begin wrapping the thread on starting from just behind the bead head. Create yourself a thread dam just behind the bead to stop it from moving forward. If you’d like, you can also substitute in some non-lead wire just behind the bead to secure it and add some extra weight. Once you’ve got your thread dam created, move the thread back down towards the hook shank, covering all of the hook in a thin layer of thread.


Step 2:
Take your pheasant tail feather and pull of 8-10 fibers. Line the fibers up together so they are at equal length and place them at the back of the hook curve, behind the hook shank. Secure the pheasant tail down lightly with a few wraps, then adjust the pheasant tail according to the length you believe the tail should be. I like it to be about the length of the hook shank. Once you have a length you feel comfortable with, secure the pheasant tail down with a few tight wraps.

Step 3:
Cut off an orange goose biot from the biot string. Secure the biot on top of your pheasant tail wraps, with the tapered end being the one that is secured. Cut off any tapered excess, leaving the blunt end hanging off the back of the hook.

Step 4:
Wrap the brown thread forward to just behind the head of the orange bead. Next grab a length of small orange wire and cut it off the spool. I think about 5 cm will be a good amount. Place the orange wire just behind the orange bead and begin securing it down with thread wraps. Continue wrapping the orange wire along the side of the hook until you’ve reached the point where the biot and pheasant tail are secured down. Once complete, wrap the thread back up to just behind the bead head.

Step 5:
Grab the unsecured end of the pheasant tail fibers and begin wrapping them around the hook body moving toward the orange bead. Make sure all of the hook is covered and not to overlap the pheasant tail to much as it will make your fly bulky and unnatural. Once behind the orange bead, secure it down with some thread wraps before cutting off the excess pheasant tail.

Step 6:
Pull the orange goose biot forward toward the orange bead. Have it cover the back of the hook body and pheasant tail. Once in place, secure it behind the orange bead with a few thread wraps. If necessary, adjust the orange biot so it is correctly aligned along the back of the hook. A few more tight wraps of thread and then cut off the excess orange biot.

Step 7:
Take the small orange wire and wrap it in the opposite direction that you wrapped the pheasant tail. This will make sure there is extra strength in your fly by securing down the pheasant tail further. Wrap the wire in equal portion, which will create a nice segmented body. Once you have wrapped to just behind the orange bead, make a few wraps just behind the bead with the wire and then secure it down with thread wraps. Once secured, you can helicopter or cut off the excess wire.

Step 8:
Grab a nice brown hen feather from your saddle and pull off the bottom section of fibers on both sides. Next grab the tip of the feather with your thumb and push back the fibers below your thumb to create a sort of wing look. While still clutching the tip, cut off one side of the fibers on feather leaving only one “wing”. Take the feather and place the fibers that were protected by your thumb just behind the orange bead. Secure the feather down with a few thread wraps before cutting off the excess that was originally protected by your thumb. You should be left with one side of the feathers without fibers and one with fibers. Next grab the end of your feather and wrap it around the hook just behind the bead. Once completely wrapped, secure the feather down by pulling back on the fibers and making a few thread wraps.

Step 9:
There should be a slight void between where the hackle you’ve wrapped in and the bead is at this point. Now, take out some brown dubbing and make a small, thing dubbing noodle. Wrap the dubbing noodle over the void and repeat until the voice it covered. Next whip finish the fly just behind the orange bead with three wraps. You may want to add a single drop of glue behind the bead for extra strength.

Wow, 9 steps for something that was supposed to be quick and easy, right? Ya, I know, lots of writing but honestly it is a simple fly. Once you’ve tied it up once or twice you will be able to knock these out in a few minutes tops.

What I really like about these flies is you can add a lot of variation to them. You can change up the bead, biot, and wire color choices of this fly to make it your very own. Furthermore, you can use different colored versions of the pheasant tail to put a little bit of your own flair into these wonderfully effective flies.
Tight Lines,
Jake


