
By Joseph Bartholomew
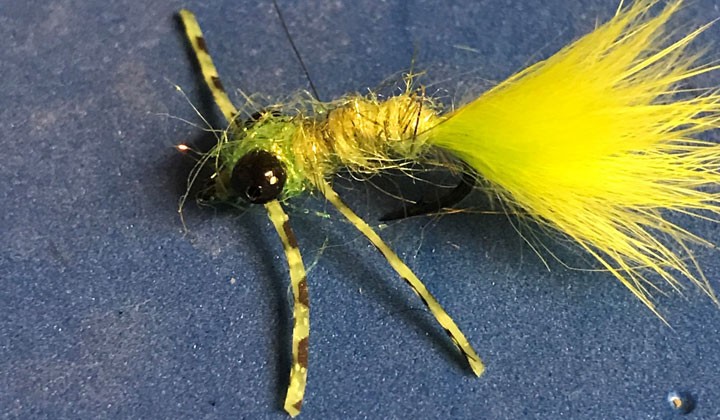
The first version of this fly was tied as an experiment and thrown in my fly box without another thought. There it sat for about three months until one day, while streamer fishing I came across a walleye sitting in some rocks. I snuck into position and made a perfect cast with my streamer. The walleye came up and inhaled my fly… then spat it out as quickly as he hit. After that, he wouldn’t give that fly another look. In desperation, I looked in my fly box for something to throw at this stubborn fish when that experimental fly caught my eye. I tied it on and made another cast. The fish came in and absolutely smashed that fly! After a short fight and a few quick pictures, he was released to swim again. It was that fish that made me realize that I may have something good in that fly. It went through about four versions and this is what I eventually ended up with. The name comes from the two patterns that influenced this fly: the Complex Twist Bugger and the Slumpbuster. It took quite a bit of thought, but I ended up dubbing it (no pun intended) the Combuster. As the name implies, this fly is hot. I’ve had fish come back several times to eat this fly. The size is small enough that it doesn’t spook a ton of fish but big enough that the local predators consider it a good meal. This fly has caught me my two biggest browns, some big walleye, and even a few carp. I hope it produces for you!
Recipe:
Umpqua Tiemco TMC5263 Streamer Hook
Hareline Tungsten Cone(size: Medium) or Hareline Sculpin Helmet(size: Small)
Olive Barred Rabbit(or Zonker) Strip
UV Polar Chenille Olive Copper
Instruction:
1. Slide the helmet or conehead on small hole first and wrap any lead wire you want to at this point (I’m not putting any on here because I’m fishing this streamer in shallow water).
2. Now get your thread started just behind the helmet or lead wraps. If you are using lead cover them with your thread then wrap down to just about the bend of the hook.

3. Next, hold the schlappen by the tips and preen all of the fibers and snip off part of the tip, leaving you with a small triangle.

4. Tie in the schlappen by the triangle and polar chenille by the end.
5. Pull both towards you and hold the schlappen by the stem and bring the polar chenille there as well.
6. I will demonstrate the ghetto way of doing this next step, but if you have a gator clip to tie complex twist bodies then use it. Twist in one direction with your thumb and index fingers until bound quite well. Use either velcro or a Stonfo brush to pick out all the fibers at this time.

7. Wrap the body up until about two or three eye-lengths behind the helmet, preening the fibers back as you go. Secure with several tight wraps of tying thread. Pick out the fibers one last time.

8. Next, preen the fibers up (wetting your fingers will help with this).

9. Now take your zonker strip and measure it, I personally like a tail a little shorter than the length of the hook shank. Leave your thumbnail at the length of the tail. Make sure you leave about another 4″ of zonker past the mark.
10. Pierce the zonker through the hook point and move the strip to right where the body starts.

11. Tie the strip off with a couple of very tight wraps at the top of the body. This is where GSP really helps because you can really crank down on it.

12. Palmer the zonker strip just behind the helmet between two or three times.

13. Now, loosely put two wraps of thread around the zonker strip right behind the helmet. Before pulling it tight, cut the zonker about 1/8inch above the thread wraps and tag it with a little bit of super glue. Then slowly pull tight, doing it this way pulls the tag end of zonker into the fly and makes for a lot cleaner of a fly.


14. Give it a 5-6 turn whip finish.

15. Insert the nozzle of the super glue into the cavity of the helmet and put a little bit of super glue over the thread wraps.

16. Start your thread back right in front of the helmet and build up a thread dam to help keep the helmet from moving.

17. Whip finish and add a drop of head cement.

I hope this pattern works well for you. If you want any tips on how to tie this pattern or show me any fish you catch on it, you can DM me on Instagram @fishin_wild. Happy tying everyone!


