
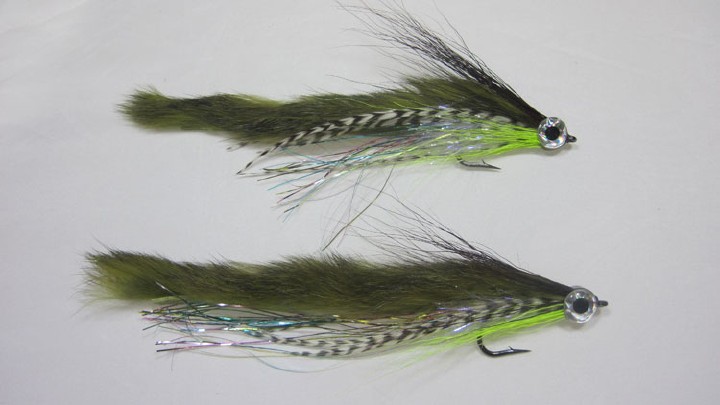
This fly was born on the bench one stormy night late in the summer for 2017. My brother had still not landed his first Bull Trout on the fly and time was ticking. We had one last opening to get out on the water to pursue the great Bull Trout. I had learned a lot of streamer techniques throughout the year and I just let the knowledge of everything I had learned flow through me. Here in my neck of the woods we are strictly single barbless hook only, but everyone knows articulated flies catch bigger fish. So I was able to create this single hook with that still had an articulation. Needless to say, she is a killer and got my brother his first Bull Trout! The only problem is it needs a name and that’s where all you the readers come in.
Materials:
- #2-10 Bass Bug Style Hook
- 20mm shank
- 140 Denier Thread, White
- Pearl Flashabou
- Magnum Black Barred Olive Rabbit
- UV Polar Chenille, Silver
- Red Chinese Cape Feather
- Orange Guinea Feather
- Crazy Legs, Olive/Black and Pearl/Silver
- Senyo Laser Dub, Olive and Silver Minnow
- Fishskull Sculpin Helmet – Small
- UV Resin
1. Dress the entire shank of the hook with thread making a good base so your materials will not slip on the bare metal. Leave a 1 eye length space at the front of the hook for ease of finishing this section of the fly. End with your thread just down the bend of the hook. Secure approximately 15 strands of pearl Flashabou to the top of the shank with 4-5 snug thread wraps, leaving around 1.5 times the shank length hanging off the back. Now double over the Flashabou and secure that in as well. It’s ok if we end up with a bump as it will act as a stopper for the rabbit strip.

2. Trim a taper into a magnum rabbit strip so the end comes to a point. Now mark a point in the hide of the rabbit strip that is 1.5 times the shank length of the hook. Remove your hook from the vise and push the point of the hook through the hide where you marked it. Push the hide all the way down to the Flashabou. Now re-secure your hook in the vise upside down, aka hook point facing up. At this point you can also trim the rabbit strip just slightly longer than the eye of the hook if it’s going to get in the way. You can also trim the Flashabou at this point inline with the end of the rabbit strip.

3. Secure the core of some UV Polar Chenille right in front of the bump from early and palmer it forward with touching wraps to one eye length back from the eye. Secure the Polar Chenille with 5 or 6 really good wraps and cut away the excess. I highly suggest some type of guard for the hook point for this step just to save your hands.

4. Split the Polar Chenille 50/50 over the top of the hook shank. Then pull the rabbit strip tight against the bump from the Flashabou and secure it right behind the eye. Tie it in super tight and use lots of wraps. When you are happy with it give it two 5-6 turn whip finishes and hit it with some UV resin.

5. Attach the 20mm shank to the hook and secure the shank as best you can in your vise. Start your thread on the shank and wrap backwards making as tight as wraps as possible without breaking the thread. We really want to close that loop and make it secure.

6. Next secure a small piece of the magnum rabbit hide to the front shank. The actual hide should touch the thread head of the back hook thus creating a seamless transition. Exposing the hide to tie in this part goes a long way in making it easier. This is just a small piece of material, but really helps the body of the fly fill out.

7. We will now tie in a red feather from chinese cape. The feather is tied in tip first and then palmered for about 3-4 turns. Tie off the feather, cut away the waste and use thread turns to point all the fibers back ward if needed. The next feather is an orange guinea feather. The feather is tied in by the tip as well and palmered for 3-4 turns. These feathers are added to either imitate gills or a bleeding fish, plus I believe all fish hate orange and will kill it on sight! At this point in the tie you will want to make sure we still have room for the sculpin head as well.

8. Finally we will be building up the head area. You will want to get about a pencil thickness clump of the Olive Laser dub and start pulling it out. The goal is to try and get all the fibers running end to end and not all wound up. If you think the fibers are too long you can usually just tear them with a fairly hard tug. Secure them in the middle of the fibers to the top of the hook. Repeat the exact same step with the Silver Minnow Laser dub, but attach it to the bottom of the hook. You should end up with a large “X” of dubbing. Again, this is a great time to see where you are with the Sculpin helmet. Sometimes, this is it and no more material is needed and other times you will need to build another “X” of laser dub.

9. No real streamer can be complete without some Silli Legs. Attach two of the olive and two of the pearl-silver legs to the near side of the shank at the halfway point on the legs. Secure them with two solid wraps and then fold them over to the far side and finish tying them in.

10.The last step is to build up a thread base near the head for the Sculpin helmet to attach to. Keep building up the head and testing f the helmet is a snug fit. Once it is, whip finish the the fly and coat the wraps in super glue. Now press the helmet on as firmly as possible. Let the glue dry, trim the Silli Legs and start fishing!

Thanks for reading and don’t forget to give me a follow @kootenay_kid for more demo’s and a chance to name this streamer!


