
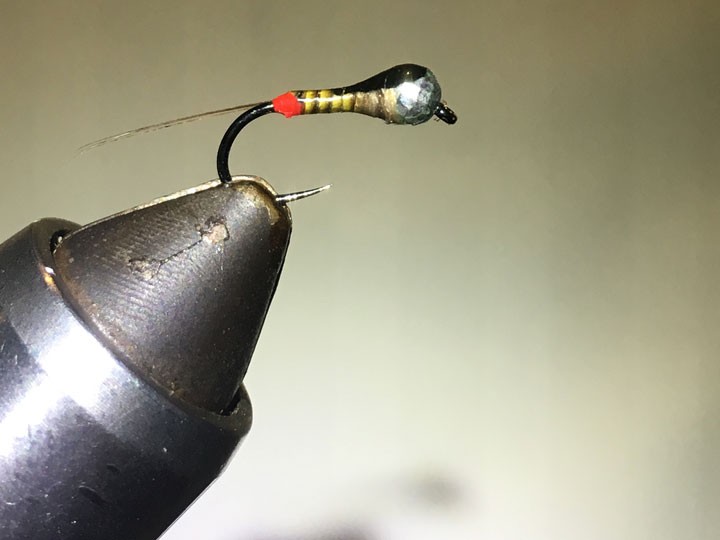
Sometimes flies are created out of necessity, and other times they are created out of new materials that leave you scratching your head what to do with. This fly came out of the latter, after a friend of mine introduced me to Semperfli Straggle String. I had seen him use it as a body wrap on his stimulators and couldn’t resist buying a roll. However, my dry fly box was stuffed to the brim and I was in serious need of some new nymphs. There I was, staring at this shiney, octopod like string wondering what on earth I should do with. I pondered for a few moments about what I could create and suddenly, it hit me. Straggle String would make some serious looking legs under a wing case. Thus, the Semperfli Scorpion was born.
Materials:
- Size 10 Wide Gap Caddis Pupae Hook
- Black Thread
- 1/8th Rainbow Tungsten Bead (Head)
- Black Goose Biots (Tail)
- Medium Wire, Black (Body)
- 0.015 Lead Free Wire
- 1/8th Scud Back, Black (Wingcase)
- Pearlescent Tinsel
- Semperfli Straggle String, Black (Legs)
- Loon UV Thin
Step 1:
Start by pinching down any barbs and adding the bead to the hook. Move the bead to the eye of the hook before wrapping in some lead free wire behind the bead, back to just before the hook shank. Once your wire is wrapped on, push it forward to press tightly against the bead and trim off the excess.


Step 2:
Tie in your thread directly behind the wire and snag the tag end. Cut off the excess thread and move your thread back to roughly ½ the hook shank. Cut off two black goose biots and tie them in with the curve facing outward. I like to tie in one biot at a time to make sure they are at equal lengths. Wrap your thread forward to just behind the wire, covering up the excess biot before trimming off any excess.

Step 3:
Measure out two piece of medium black wire, that are approximately 5 inches in length. I like to make sure I have excess wire as it will become easier to wrap. Grab the two pieces of wire and line them up. Place the wire directly behind the your lead free wrap and tie in before tying your thread back to the goose biots. Tie your thread forward, locking the medium wire into place. Once your medium wire is secure, continue wrapping forward coving the lead free wrap completely with thread. Continue wrapping the body with thread until you have an even taper from the tail to the head. The taper should go from thinnest at the tail, to thickest towards the head of the fly.


Step 4:
This is where things get a bit tricky. Hopefully, you have a rotary vise on hand. If not, buy one. However, if you’ve already dumped your weekly allowance on materials, I think I have a solution. Normally, at this point you would rotate the fly so that the hook shank is pointed upward. If you don’t have a rotary vise, take the fly out of the vise and reposition it so the hook shank is facing upward. Once the fly is in position, tie in a small, 1 inch piece of pearlescent tinsel. Wrap your thread back over the tinsel about 1 cm. After the tinsel is in place, take a 1 inch piece of scud back and wrap it in directly over the tinsel.

Step 5:
Cut off a 3 inch piece of straggle string and tie one side in over the tinsel and scud back. Once secure, wrap the straggle string tightly forward until you meet the edge of the bead. Tie down the straggle string directly behind the bead with a few wraps and cut off the excess.

Step 6:
Pull both the scud back and the tinsel forward, covering the top part of the straggle string. Make a few loose wraps over the tinsel and scud back, then secure with two tight wraps once the materials are in a place you feel comfortable with. Pull the tinsel and scud back tightly forward before making to more wraps to secure down. Take your whip finishing tool and make 3 whip finishes before snipping off the thread at the bead.


Step 7:
Take some Loon UV Thin and add a small drop directly over the scud back and tinsel. If necessary, use a bodkin to move the cure into a nice oval shape. Once the cure is covering the wingcase, hit it with your UV light for a couple of seconds. Your fly should now look as good as your high school girlfriend did on prom night.

There you have it, a beautiful fly that came out of tinkering with a new material.

Seriously, these flies are more deadly than they look. Plus, you can change up the wire color, bead color, wingcase color, and biot color to make and color fly combination you desire. I personally like the way a gold bead looks with green and gold wire. My only caution is not to tie this fly any smaller. This will reduce the hook gap length and may prevent a proper hook set.
Tight Flies!
@Troutmadness


