
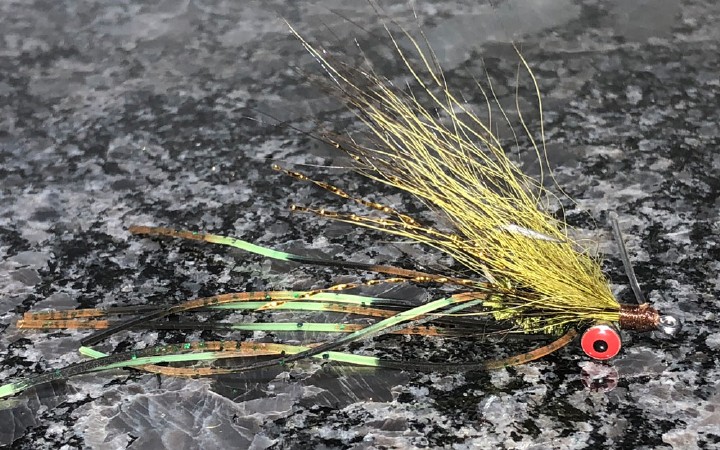
Pretty sure I saw something similar to this on Instagram sometime over the past year. For some reason it popped back into my head the past month and I decided I had to tie some. This may or may not be close to what I remember seeing and if not, I still think it’s pretty cool. I don’t always think a fly needs to look exactly like the real thing and sometimes a decent representation of that bug is good enough if the presentation is on point. If we had to be exact all the time we would all own 3D printer’s and would be excellent figurine painters like the kid down the street with the 3000 War Hammer toys.
Materials:
Hook: Tiemco 200R 6-12
Bead: Hareline Tungsten
Thread: Hareline 8/0 Veevus Thread
Antenna, Legs, Tail: Hareline Goose Biots
Rib: Ultra Wire – Small
Thorax: Ice Dub
Wing Case: Thin or Dura Skin, UTC Holo Tinsel
Step One:
Place your bead onto the hook then secure the hook into the vice. Now start the thread in front of the bead and cut away the tag.

Step Two:
Select two biots that are as close to the same size as possible. Tie them in just behind the eye slightly on top of the hook shank. I like to tie them in one at a time in order to get the placement how I like. But if you can do them both at the same time by all means do so.


Step Three:
Cut the excess part of the biots off, and do either a few half hitches or a whip finish. Cut your thread, push the bead forward and start your thread again behind the bead and cut off the tag.

Step Four:
Get your lead or lead free wire and make around 15-16 wraps behind the bead. Make sure the wire is pressed tightly up against the bead.

Step Five:
Make thread wraps over your lead or lead free wire to secure it into place. Right behind the wire make a little dam or slope towards the bend of the hook. These thread wraps are used to both secure the wire into place and make a easier transition for materials in the future. With your thread just above where the bard was (you should be pinching those) tie in another two biots. You want to make sure you take advantage of the natural curve in the biot and make them splay outwards. Again, I like to do them one at a time to ensure correct placement.

Step Six:
Advance your thread up to just behind the lead wire. Now take your black wire and tie it in right behind the lead. Now secure the wire all the way back to where we tied in the biots for the tail. Again, advance your thread to right behind the wire. Now is also the time to smooth out this section of the body from any previous sloppy wraps. The reason we tie it in this way is so the body keeps roughly the same diameter for the tail to right behind the lead and not just have a large bump by the tail.

Step Seven:
Take the black wire and wrap it forward towards the lead in an even open spiral. Capture the wire just on to of the lead and cut or break the black wire off.
Step Eight:
First cut a 6-8cm section of holo tinsel off the spool. Secure the holo tinsel to the top of the shank starting about one bead length behind the bead and wrap back just past the lead wraps towards the tail. Next cut off a section of thin skin about 4-6cm long and about 4-5mm wide. (I go shorter here because I am cheap and I don’t like to waste it). We will secure it into place the same as the holo tinsel. The reason the tinsel goes down first is when we are done and pull them both forward we want the tinsel on top.


Step Nine:
This step is pretty straightforward and simple. Using the dubbing create a nice even dubbing noodle on your thread and then form a dubbing ball right where the last wraps were tying in the thin skin and holo tinsel.

Step Ten:
More biots! Select two more biots and time in on either side of the hook shank right in front of the dubbing ball. When you wrap back to directly in front of the dubbing ball it will server as a ramp to splay the biots outwards.


Step Eleven:
Basically you repeat steps 9 and 10 until you have three legs on either side of the shank. You are aiming to end right behind the bead.


Step Twelve:
Now that all the legs are in place and the thread is right behind the bead it’s time to pull things forward. First start with the thin skin. I like to pull this forward and capture it in place with a firm 2-3 wraps. Then I do the holo tinsel separately in order to line it up just where I want it. Once everything is tied in and lined up give it a 2-3 turn whip finish. No need to do a big whip as it’s going to get a solid UV resin treatment.


Step Thirteen
So in this step I just build up a nice little dome of UV resin. Make sure the resin goes over the wraps and slightly onto the bead. I normal do 2-3 coats curing them in-between. I find this cures the best and I have the most control over the shape and form.


Final Step:
Go fish…

Thanks for reading and hope you enjoy whipping a few of these up yourself!


