
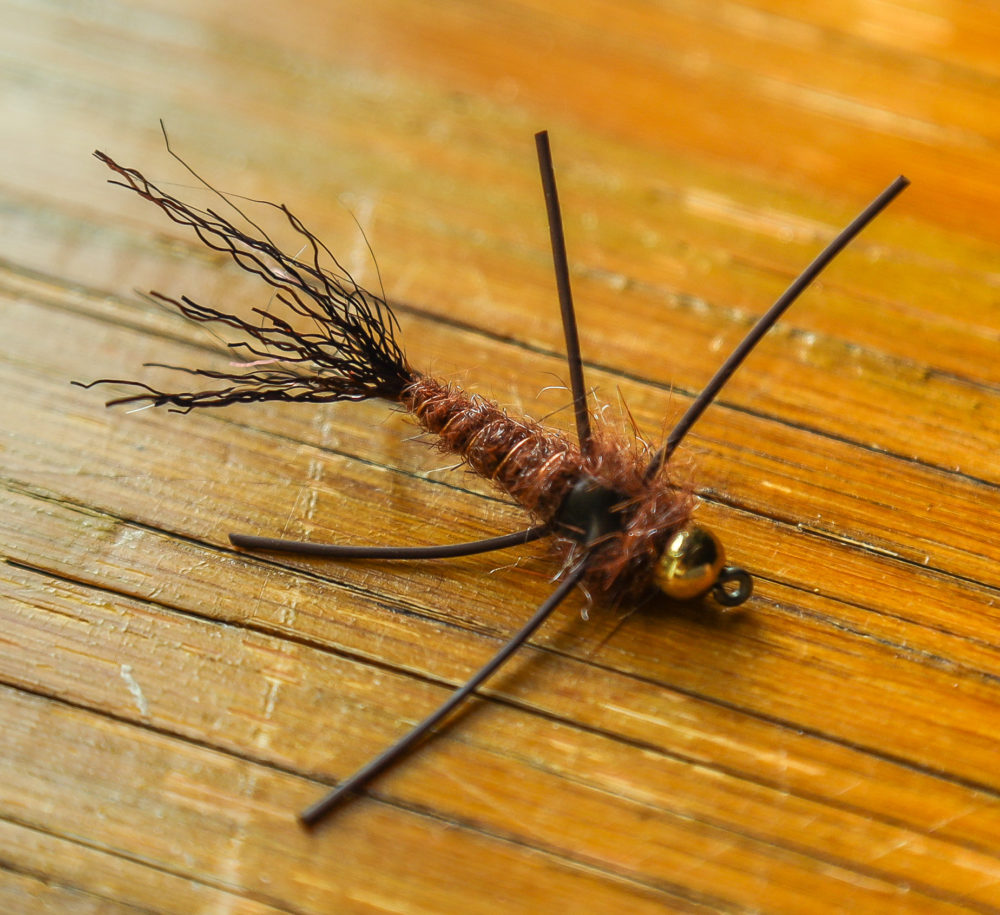
Welcome back! You fine folks are in for a treat today, as I want to share with you how to tie up a Golden Rowley Stone. This was my most productive stonefly pattern last season, leading to big fish with big appetites. For this fly I took the traditional Rowley Stone and switched out the turkey feathers for biots, added in some peacock ice dub, and removed the signature orange hotspot collar normally associated with this fly.
What makes this fly special is the addition of Netback Foil. This interesting tying material adds a touch of realism that isn’t seen when using Thin Skin or other stretch material. However, you can substitute it out and use any stretchy wing case material you have on hand. Furthermore, you could sub out the goose biots for rubber legs or go with the traditional turkey feathers. That is one excellent feature of this fly, versatility. You’re able to make a variety of changes to have it fit your signature style. From the dubbing to the thread choice, you can really put a personal touch to this fly and it will still fish wonderfully.
So, let’s get down to it and learn how I tie this baby up!
Materials:
Size 6 – 12 Curved Caddis/Egg Hook
STEP 1
If you’re working with a barbed hook, debarb and put the tungsten bead on and move it to the front of the fly. Grab your round wire and start wrapping from the end hook shank to where it meets the tungsten bead. Push the wire tightly up against the bead and snip off the excess. Once thats completed, tie on your thread just behind the wire wrap and snip off the tag end.

STEP 2
Cut off a 6 inch length of 3x(8lb) mono and tie it in directly behind the wire wrap. Securely tie down the mono and move towards the back of the fly, stopping approximately halfway down the distance of the hook shank.

STEP 3
Grab a very small amount of peacock ice dub and make a tiny dubbing noodle. Tie a small dubbing ball at the back of the hook. Next, cut off two amber biots and split them between the dubbing ball you’ve created. This will splay out the biots, creating the tail of the stonefly. Once you’ve tied in your biots, wrap your thread back up the body of the fly, covering all of the wire wrap and creating a slightly tapered look to your fly, before moving your thread back behind the dubbing ball.


STEP 4
Okay, so this part is a bit tricky and I suggest looking at the picture of the cut-out Netback Foil as a guide. To begin, you will need to cut out two sections of the Netback Foil that will eventually become the shell of your stonefly. The two pieces you cut out will be different sizes and are measured using the design found in the Netback Foil material. The smaller section width will be cut starting by measuring two half hexagons on each side, while leaving one whole hexagon in the center. The larger piece will contain two whole hexagons in the middle, and a half hexagon on each size. The length of these pieces should be roughly 14 hexagons in height, depending on the size of hook you’ve chosen. Once you have both pieces cut, tie in the small width piece right behind the dubbing ball.


STEP 5
Once you’ve tied in the small width Netback foil, take the peacock ice dubbing and create a thicker dubbing noodle. Begin wrapping your dubbing noodle forwards until you’re just behind the wire wrapping. I suggest making this portion a bit thick, as the next step will have you lose some of the volume you’ve created.

STEP 6
Fold over the Netback Foil and tie in down over the wire wrap. Be sure to pull the Netback Foil material tightly, as you want it to be secure and not give it a chance to move. Once the material is in place, grab the monofilament you tied in earlier, and begin to wrap it in the opposite direction you wrapped your dubbing noodle. This will add extra strength to your fly and prevent dubbing from coming loose. When wrapping the mono, follow the line found at both the top and bottom of the hexagon shape on the Netback Foil. Once you’ve reached the end of the secured Netback Foil, tie down the mono and cut off the excess.

STEP 7
Tie in the larger width piece of Netback Foil right at the edge of where you tied down the smaller piece. Once that is secure, create a new dubbing noodle and dub forward to the front of the hook, then dub backwards to where you’ve tied in the new piece of Netback Foil. On each side of the fly, tie in an amber goose biot and cut off the excess biot piece. Once secure, create a new small dubbing noodle and cover the exposed excess biot piece with dubbing and move to the middle of the newly dubbed area.


STEP 8
Fold over the Netback Foil, creating a ridge along the back of your stonefly. Tie down the Netback Foil, locking that fold you’ve created in place and pull the excess backward. Grab two more goose biots and tie them on either side of your fly, cut off the excess, and dub over. Repeat this step with two more biots just behind the tungsten bead, cutting off the excess biot and covering the exposed biot excess with dubbing.


STEP 9
Make another fold along the back of your stonefly with the Netback Foil. Holding the foil in place, secure the material with a few thread wraps while making sure to keep the fold from moving. Once you’re happy with the placement of the Netback Foil, finish the fly with a few whip finishes and cut off the thread. Add a few drops of head cement where you’ve laid your knots and wait for it to dry completely. Once your cement is dry, cut off any excess Netback Foil that is covering your tungsten bead.

BONUS STEP
For a little added realism, I like to fold the biots by pressing them firmly against the side of the fly. Biots are surprisingly strong and do not tend to break when you’re doing this step. I like to really put some force behind it and make sure to create a proper crease in the biots. If you’d like, you can add a small amount of UV cure to the biots to lock them in place.
At first you might find this fly takes a great deal of time to complete, but I promise you with a few goes you will be breezing through each tie. I have yet to find a stonefly that has been as reliable as the Golden Rowley Stonefly. If fished correctly, you will have more trouble keeping the fish off your line than you had tying up the fly in the first place. You won’t regret tying up this durable and reliable fly.
Tight Lines!


