
Up here in the the interior of British Columbia there is a period in the season where all the rivers, streams and creeks are closed to fishing, April 1st. Though I agree with this closure as I want all these fish to spawn and thrive I still often refer to this as the worst day of the year. This brings on the the wait for the lakes to thaw, and reveal some hungry fish!
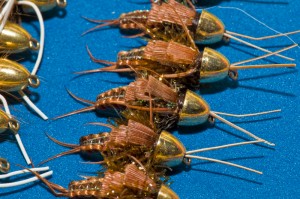
Even though I tie steady all winter, lake season seems to sneak up on me and I need to rush to fill up the box. There is a pattern in my area called the Screaming Viking that does very well. It’s basically an olive chironomid with a red butt section. I do a slight variation on this and tie it with an orange butt section. Today I am going to share with you guys how I tie this fly.
Recipe
- Hook: Umpqua 2302 #12-16
- Thread: 70D or 8/0 Olive and Fluorescent Orange
- Bead: 5/32″ Black Tungsten or smaller depending on hook
- Gills: White Antron Yarn
- Rib: Small Gold Wire
- Finish: UV Resin
Step One: Place the bead on the shank of the hook and secure the hook in the vise.

Step Two: Start the fluorescent orange thread right behind the eye of the hook, but in front of the bead. Take wraps down the shank of the hook, about an eye lengths worth. Cut the tag end of the thread off.

Step Three: Cut free a one inch section of antron yarn from the bundle. If necessary remove some of the material so the size is suitable for the hook. Secure the yarn to the hook starting one eye length down the shank making wraps toward the eye.

Step Four: Cut the antron yarn off close opposite the eye of the hook. Cover whatever yarn is still exposed and either place a half hitch on the hook or a one to two turn whip finish. Cut your thread and push the bead up to the eye of the hook.

Step Five: Start the thread back on the shank of the hook where the previous wraps had stopped. Take a few wraps towards the back of the fly and cut the tag end off. From this point forward it will be important to keep your thread wraps as flat as possible. This can be achieved by rotating your bobbin counter clockwise to reverse the natural spinning that happens when you wrap down a hook.

Step Six: Cut off a 4 to 5 inch section of size small gold wire from the spool. This is more than is needed, but makes material handling easier. Secure the gold wire on the side of the hook facing you and take wraps down the shank. As you wrap down the shank let the thread carry the wire over the top of the hook to the opposite side. This keeps all the bulk from building on one side of the fly. Again, keep those wraps as flat as possible!

Step Seven: Continue making flat touching wraps down the hook shank letting the pressure of the wraps carry the wire to the opposite side of the hook.

Step Eight: Now it’s time to make a nice taper on the hook using the thread. Again, keep those wraps as flat as you can. From the back of the fly wrap all the way to the bread and then start going back down. Everytime you come down the hook stop further from the back end to create the taper.

Step Nine: Tie off the orange thread with either a half hitch or using a whip finisher then cut the thread. Start the olive thread right behind the bead and make flat wraps to the point of the hook.

Step Ten: From the point of the hook make open flat wraps to the bottom of the orange thread and then back up to the point. You should end up with some open crisscross wraps on the butt section of the fly.

Step Eleven: Make some more flat wraps up the shank with the olive thread to the bead. Take the gold wire and make open wraps on the shank and tie it off at the bead.

Step Twelve: Trim the antron yarn to length, approximately an eye length. Then finish with your hard UV resin of choice!


